For the costumes, please select from the above widgets.

Friday 23 September 2011

OOPI celebrates Friendship and Birthdays!


There are friends, best friends, and friends you simply cannot imagine your life without ... The kind of friends that make life brighter, smoother,  bearable during trying times and generally put happy accents wherever and whenever you need to smile.
I am very fortunate to have a friend just like that.
Today is her Birthday.
And as we all know, Birthdays are really the kind of days that can go either way. Well adults' Birthdays anyway...

So I made a little something for her:


with bold graphics and lots of orange,


a very happy -OOPI- kind of purse,


 with more colour surprises inside,


 because I can't seriously call it "The Gero Purse" if it doesn't have  a touch of brown somewhere ....


What the kids have been up to ...

School Holidays have started  and although the weather was fantastic - well at least until mid-afternoon - we had to stay home. Mia is better today but not well enough to go running around. I needed to find something fun and new to do, that would keep her, and Louis, busy for a while. I realised that I never made playdough WITH them. I have made some FOR them, when they were too little to care about the playdough making process, but never since.


2 cup of plain flour
1 cup of salt
2 tbs of cooking oil
4 tbs of cream of tartar
1 cup of water
Food coloring


Mix the lot on the stove top until it forms ball. It should roll under the spoon and detach from the bottom of the pan.


Divide in as many portions as you want colours


make a small well, pour in some colorant, close well and knead,


until the colour show. This was Mia and Louis' favourite part.


They made pizzas,


and quiches,


A real feast,


with yummy cupcakes for dessert,


Two hours of playdough fun,


and I'm sure more in store for tomorrow.

Wednesday 21 September 2011

Bitty Baby Vintage Dress Tutorial


As promised, here is the tutorial for the vintage Bitty Baby dress. Because half the dress is already made; (I have used a pillowcase part of my Op Shop challenge) you won't find here how to make ruffle etc ... but I am SURE you have an old pillowcase, a forgotten dress or skirt, that has already done the job for you.


For the bodice:
You'll need a 15"x 16" rectangle
I have used a placemat (also part of my Op Shop challenge). First I"ve carefully separated the two layers, to make the most of the nice fabric. (The second rectangle will be used to make the bonnet).


The bodice piece looks like this:


Now, don't be put off by having to draw your own pattern; with a model and a little guidance, you will do this easily.


Let's have a look when folded in half:

side view
Remember, each square on the blue mat represents 1". Fold your rectangle in half and start with a broader shape (red outline) then draw and cut out the curves. Don't worry too much about getting the "pointy ears" (=ties) exactly as mine; since they will be tied up, it does not need to be an exact science.
I knew you could do it!

Pinned your bodice pattern onto your fabric and cut Two.
I wanted to make the most of the nice placemat border so I carefully positioned my first piece before cutting.

And did the same for the second one. You should now have two pieces like this:


Overlock or zig-zag stitch bottom edge of each piece.


With Right Sides together, stitch along sides starting at about 1" from overlocked/zigzag bottom edge, then all along top (all along those funny ears = shoulder ties)


Note:
Because the dress opens on both shoulders, I first thought this would be a wide enough opening to slide it on and off.
Half way through, I realised it might be awkward for Mia's little hands. That's why you can see on the back opening of my dress a not so pretty overlocked seam. Because you are sewing the sides together in the above step, you will have a much neater finish. Lucky you! Remember to leave a 1" space before starting to sew the sides. This will help later on when "sandwiching" the skirt between the bodice pieces.


Time to flip over, press and top stitch along sides starting at 1" above bottom edge and along top. (do not top stitch bottom edge).

You now have a completed bodice. Bravo!


The skirt:

You will need a 24" wide x 6" tall (including ruffle) rectangle.
Overlock or Zig-zag stitch the 6"sides.


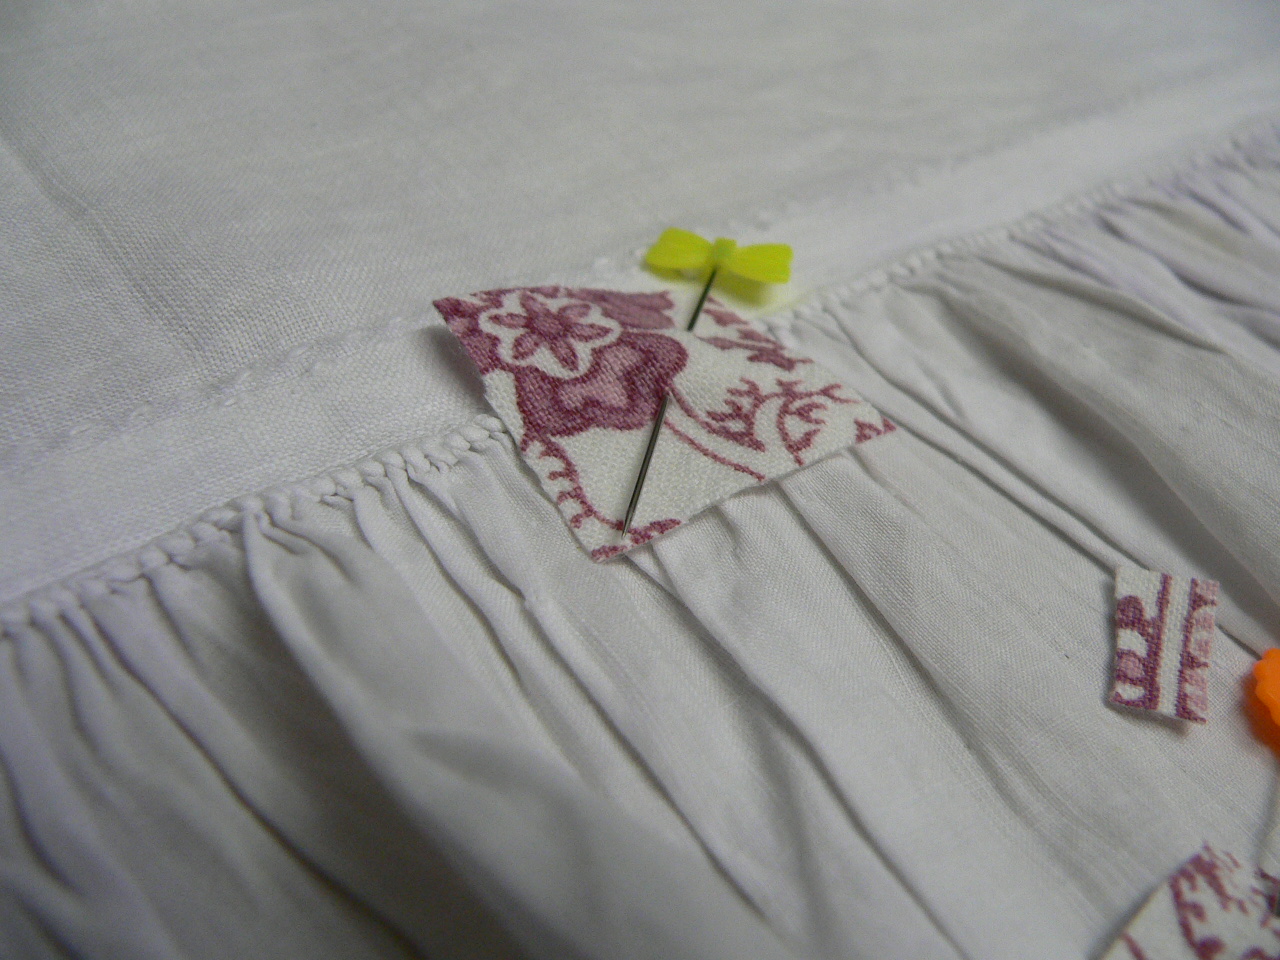
The vintage pillowcase had a few tiny holes. So I cut different sizes and shapes patches,


pinned them on,


And zig-zag stitched them, (adjusting zig-zag stitch lenght and width to small)


Without holes in the pillowcase, I'm not sure if I would have had the idea to stitch patches on but I love the result! It's up to you to add them or not, holes or no holes!


Time to gather:
setting your machine on the largest straight stitch, stitch a first line at 1/4" from raw edge without reverse stitching on either ends. In the same manner, stitch a second line 1/4" below the first. Pulling one of the thread on each side, adjust the gathering to match width of bodice.


With Right Sides together, pin skirt to front bodice layer and stitch just below second gathering line.
Turn over and press back of bodice over like so:


Inside view

Outside view

The gathering is neatly sandwiched between the two layers of bodice. Top stitch on the front
, making sure the back piece is nicely aligned. Stitching (the back bodice) from the front will ensure you have the neatest line of stitches showing.


Finish Top stiching bodice sides, tucking in raw edges. All you need to do now is closing the dress at the back. With Right Sides together, bring overlocked edges together and stitch along, stopping at begining of bodice.

The dress was somewhat too pretty for velcro, so I've used a small hook instead.


Et voila!


Monday 19 September 2011

September Op Shopping Challenge: Item 2: The Terry Towel


I was feeling a little dull this morning. I needed to work on something bright and stimulating. Then I remembered the red and pink towel from my September finds. It was exactly  the project I needed.


Goodbye dullness, Hello sunshine!

OOPI bright Reversible Terry Towel Beach Bag
  A comfy beach bag with a terry towel side to rest your head against while lazily lying on that dreamy, exotic white sand ... Alternatively it works very well too at the local public pool.


 with an oilcloth inside for all the wet stuff:


And best of all it's reversible, so you have two bags in one.


Reversible Oilcloth Beach Bag with a big front pocket


Pairing terry Towel with Oilcloth has given the bag enough stiffness to stay up and opened; always a plus for a tote.


Now, this would make a nice Christmas present for someone I know ... I'd just need to add a little oilcloth zippy pouch for all the bits and pieces ... Et Voila; another Op Shop item revisited!

Tell me what you think and keep an eye for the Reversible Terry Towel Tutorial. Coming soon!

Friday 16 September 2011

OOPI Christmas Stocking crisis !

For years now I have been sewing these fun Christmas stockings. It's a pity I didn't think of taking pictures at the time because since I don't like sewing twice the same thing, it would have make an impressive photos gallery. Anyway, these Christmas Stockings sell very well at markets.

Could this be the very last OOPI Christmas Stocking?


So, with the school market approaching, I sat behind my sewing machine with the idea to  make a new series but as soon as I started, I wanted it to be finished! I thought it might change as I progressed, but no. Once I had finished this one, I really didn't feel like making more.
I guess you can only sew so much of a same project, even if the style is different each time.

Is it the end of the OOPI Christmas Stockings?


 I still like them a lot ... This one calls for chocolates and all sorts of goodies ... 


I bought the little skipping girl patch a few years ago at the Craft and Needles show in Sydney. Sadly I can't remember the name of lady/company I bought it from. She had a scrap/sample basket with all sorts of bits and pieces and I picked a couple of those.


I find it works very well here ... Maybe I should get my Gocco screen printing equipment out of the drawer and do a few new designs of my own ... Maybe this will
save the OOPI Christmas Stockings from extinction!


Well, I still have a -very- few in stock.
As usual, if you're
interested in purchasing, contact me at: mim.stepha@gmail.com
OOPI Christmas Stockings $25

Wednesday 14 September 2011

An OOPI kind of Christmas ... Dreamy toys continued...

I am really enjoying my "No stress, Non Christmas Shopping! It just seems to happen by itself! Even when I'm doing my grocery shopping at Coles!


Innocently looking for an extension cord, I ventured  the other day in a aisle I don't often visit in the supermarket: electric supplies on one side, office needs and knick-knacks for kids on the other. Although I completely ignored all the Dora', Ben 10, etc... toys shelves, my eyes got caught by this:


Neh, I first thought ... (Although it did bring back dear memories of my childhood) Anyway, since the lid was missing I had a look inside and was quite surprised ...


Out of the 120 pieces, not all were fantastic but some were actually pretty good:


All the Chooks, Roosters, Ducks, Turkeys ...


The farm Cats ...


The Rabbits ...


 And more ducks!

In fact, they are very cute, and come in triple or quadruple and can actually stand without falling every two seconds ... So for $10, ($8 actually because the lid was missing) I bought the bucket of farm animals ... and just like that, Mia's Christmas presents' list only got better ...
I didn't care about the missing lid because the plastic bucket was ugly anyway. These little animals needed a nicer container so ....


 I made a little carry pouch.


I recycled a label from one of Louis' old baby t-shirt, 
to make the new chooks'house somewhat more official ...


I lined the inside with bright, cheerful, spots to keep everyone happy,


 et voila!


I think I will add a couple of nicer horses (the ones in the bucket are nearly smaller than the roosters) because Mia just LOVES horses.


.
... while I love cats.


Now, inspired by my find, I had in mind to make a playmat, with a pond  etc  ... and it might still happened, BUT being on my lucky "No stress Non Christmas Shopping", a few days later, I came across this:


 I only looked because it was on the clearance table (ELC Belrose Supa Centre). Then I walked away ... but I kept thinking about it.


So I went back and look again.


Humm ... Chooks could live happily here .... and so could everyone else.


Could a great Christmas present be that easy to pick? Could it even be half price?


Well, yes!

ELC Cobblestone Farm $47 while stock lasts
  
But I reckon it could do with an extra pond! 

And you know what?
I bet Mia won't be the only one playing with it.